Quick Setup Guide
StoreRank makes your Shopify store discoverable and recommendable by AI platforms like ChatGPT, Claude, Gemini, Perplexity, and also Google Search.
Written By Tom van den Heuvel
Last updated 10 days ago
What you'll achieve
AI platforms can read, understand, and recommend your products
You can see exactly how AI talks about your brand vs competitors
AI-optimized articles and product pages that get cited by AI and rank in Google
A clear readiness score for the new wave of AI shopping agents
Prefer to see it first? Watch the quick walkthrough video for a tour of every core module.
Step 1: Set up technical discoverability
This is the foundation. Before AI can recommend you, it has to be able to read your store and understand what you sell. Two settings handle this.
1a. Configure Schema Settings
Why this matters: Schema is structured data that tells AI platforms exactly what your store is, what you sell, where you ship, and that you're a real, trusted business. Without it, AI has to guess. With it, AI can describe and recommend you accurately.
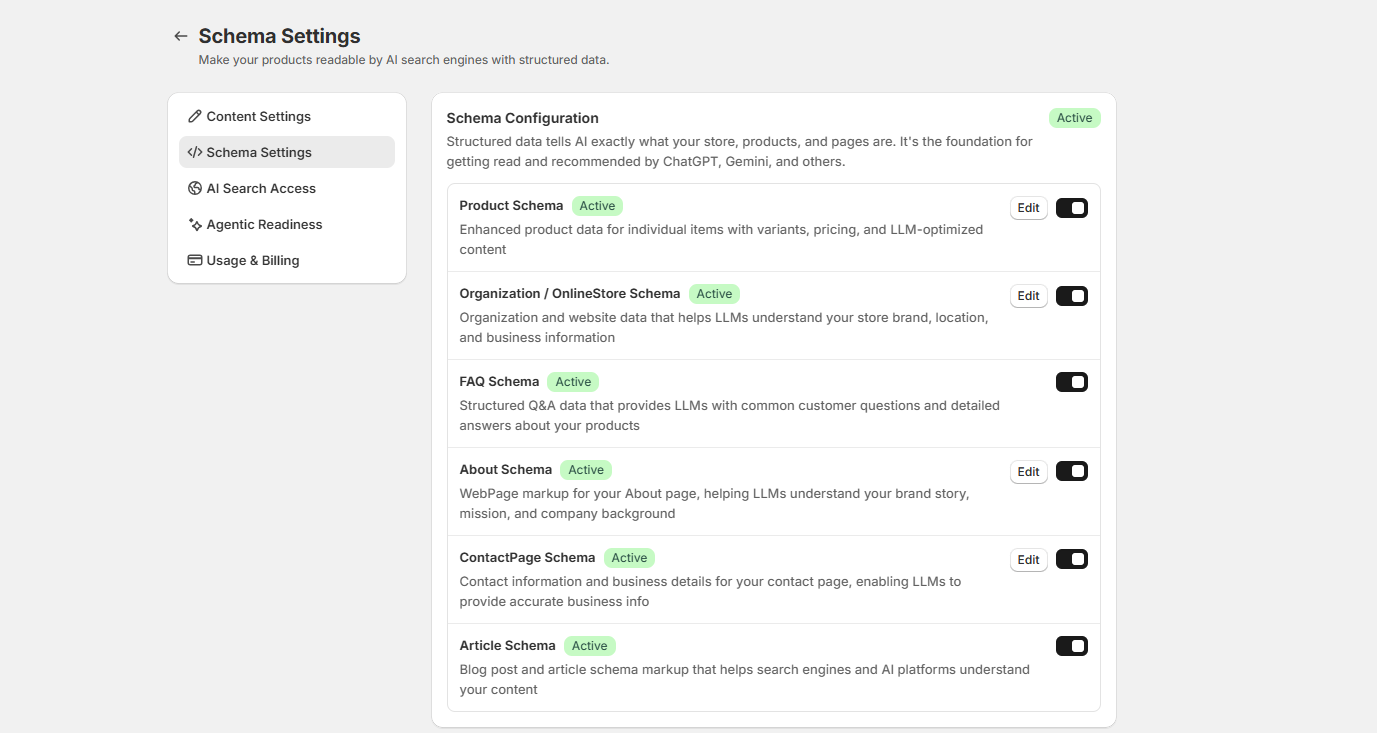
How to do it:
Go to Settings → Schema Settings
At the top, switch on the schema types you want active.
Fill out your Business Information: name, support email, address, currency, primary language, and target market.
Add your Business Description and logo.
Set your Shipping Regions. This one is critical. AI won't recommend your store to regions you don't ship to, so list every country you serve.
Add your Social Media Profiles and External Review Sites. These are trust signals. Brands with verified profiles and reviews get recommended above those without them.
Click Save.
1b. Configure AI Search Settings (llms.txt and indexing)
Why this matters: Two things happen here. First, you confirm AI crawlers (ChatGPT, Claude, Perplexity, and others) are allowed to access your store. If they're blocked, you're invisible to AI. Second, your llms.txt file works like a menu you hand the AI: here are my most important products, collections, and pages, look at these first.
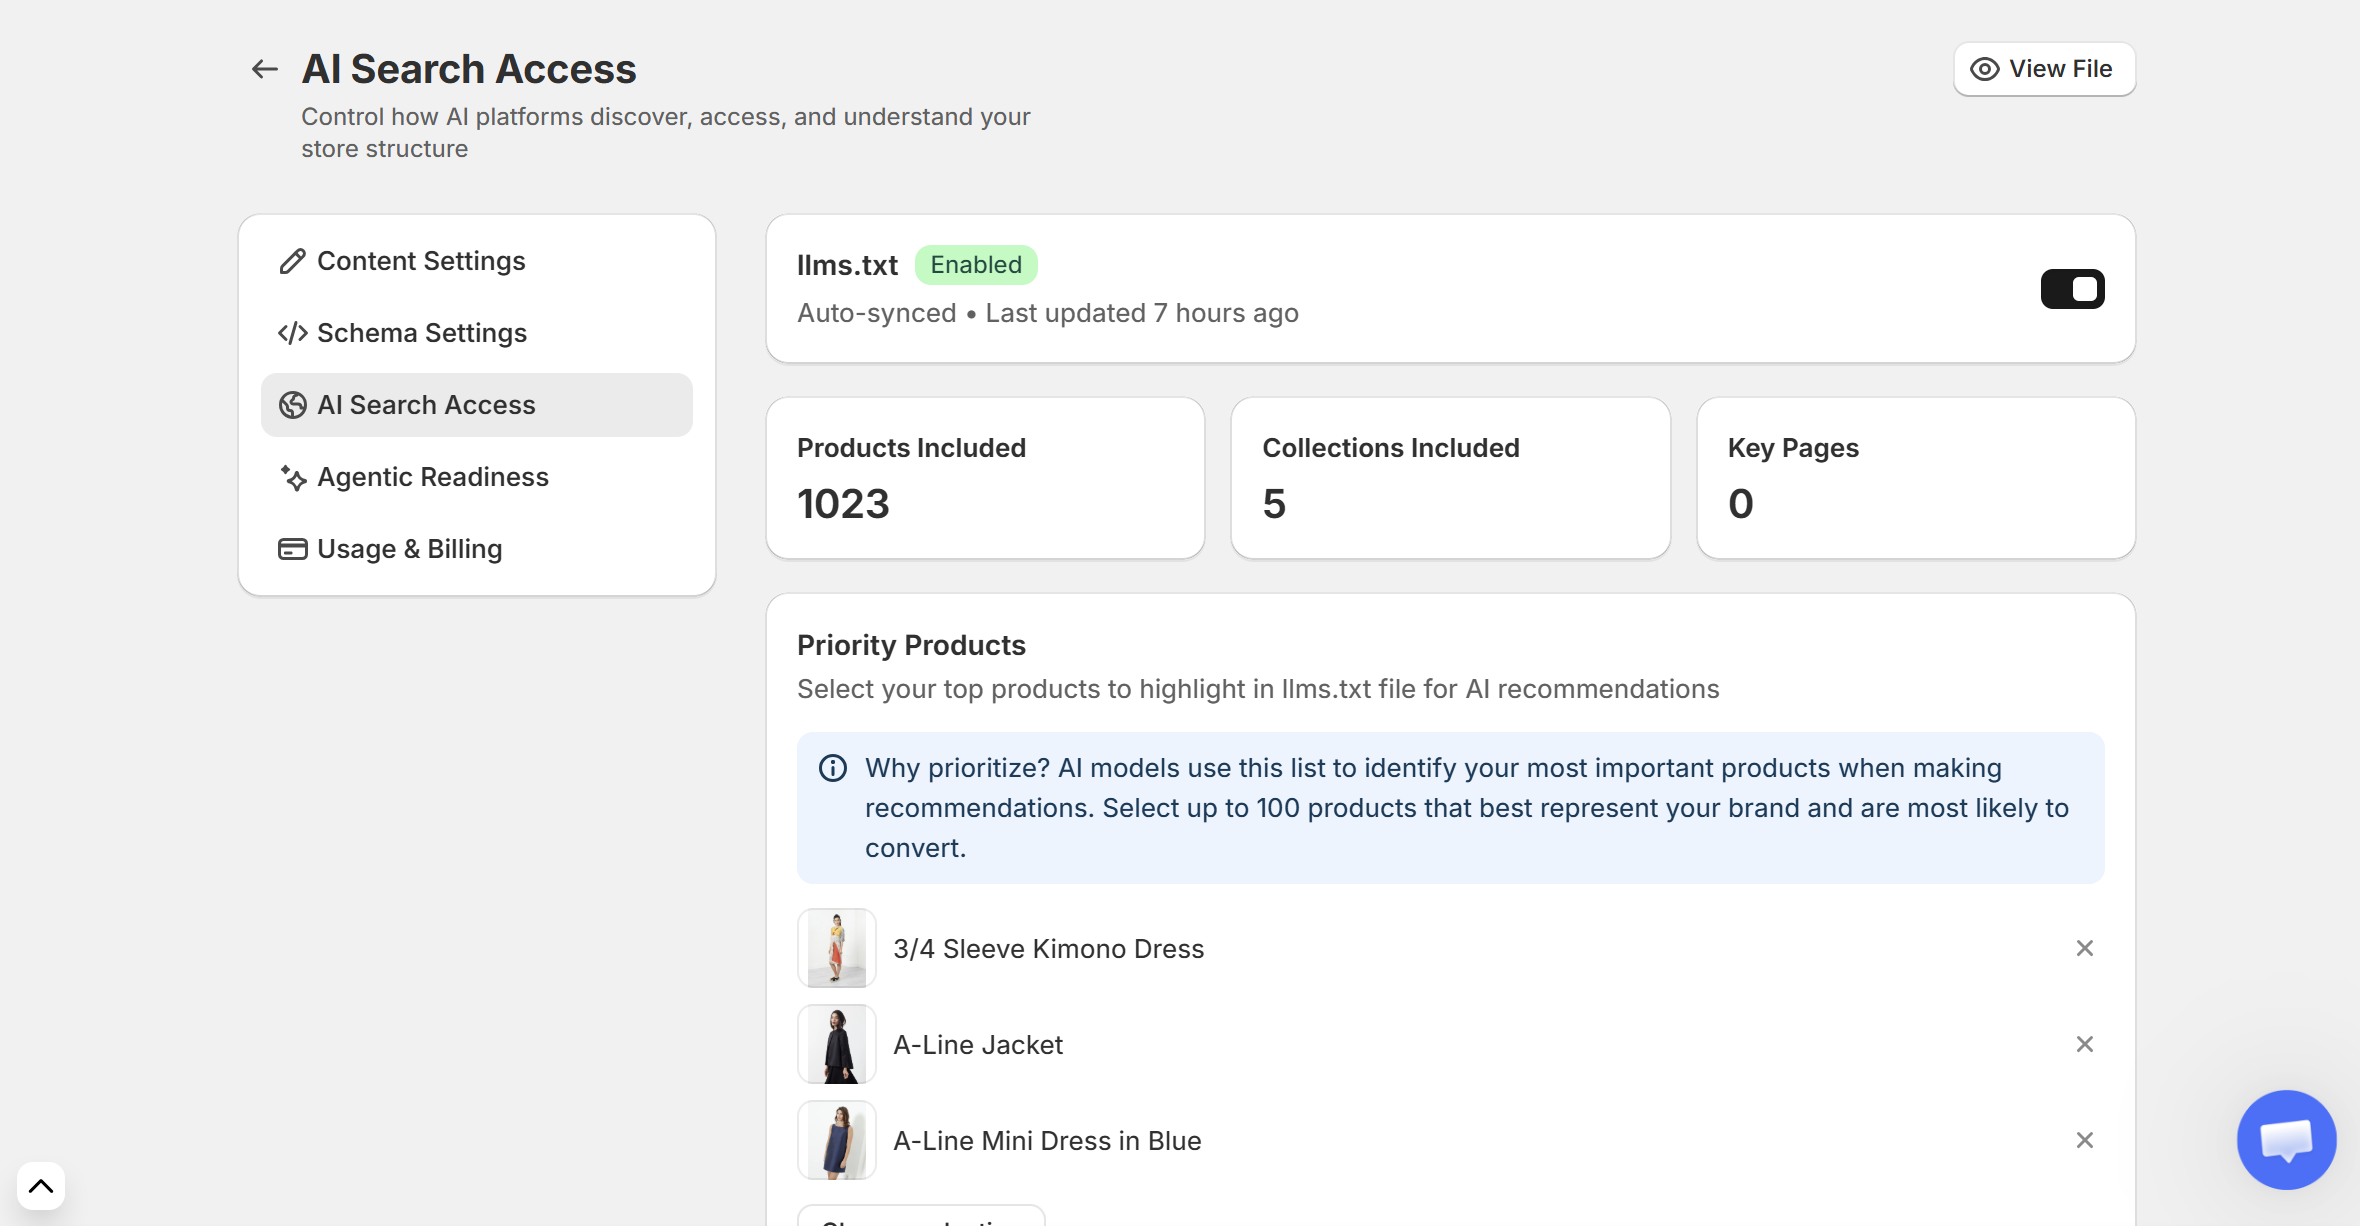
How to do it:
Go to Settings → AI Search Settings
Make sure llms.txt is Enabled (toggle at the top). It auto-syncs as your catalog changes.
Optional: click Configure, then under Priority Products & Priority Collections, select up to 100 products that best represent your brand and are most likely to convert. Add any Key Pages worth highlighting: shipping, returns, size guides.
Switch on AI Search Indexing (below llms.txt). It tells AI-powered search engines right away when your products or pages change.
Step 2: See where you stand in AI search & Google
Why this matters: This is your scoreboard. It shows how often AI mentions your brand, how you rank against competitors, and the exact URLs AI cites as sources. Those citation sources are gold. They're the sites you need to get mentioned on to climb.
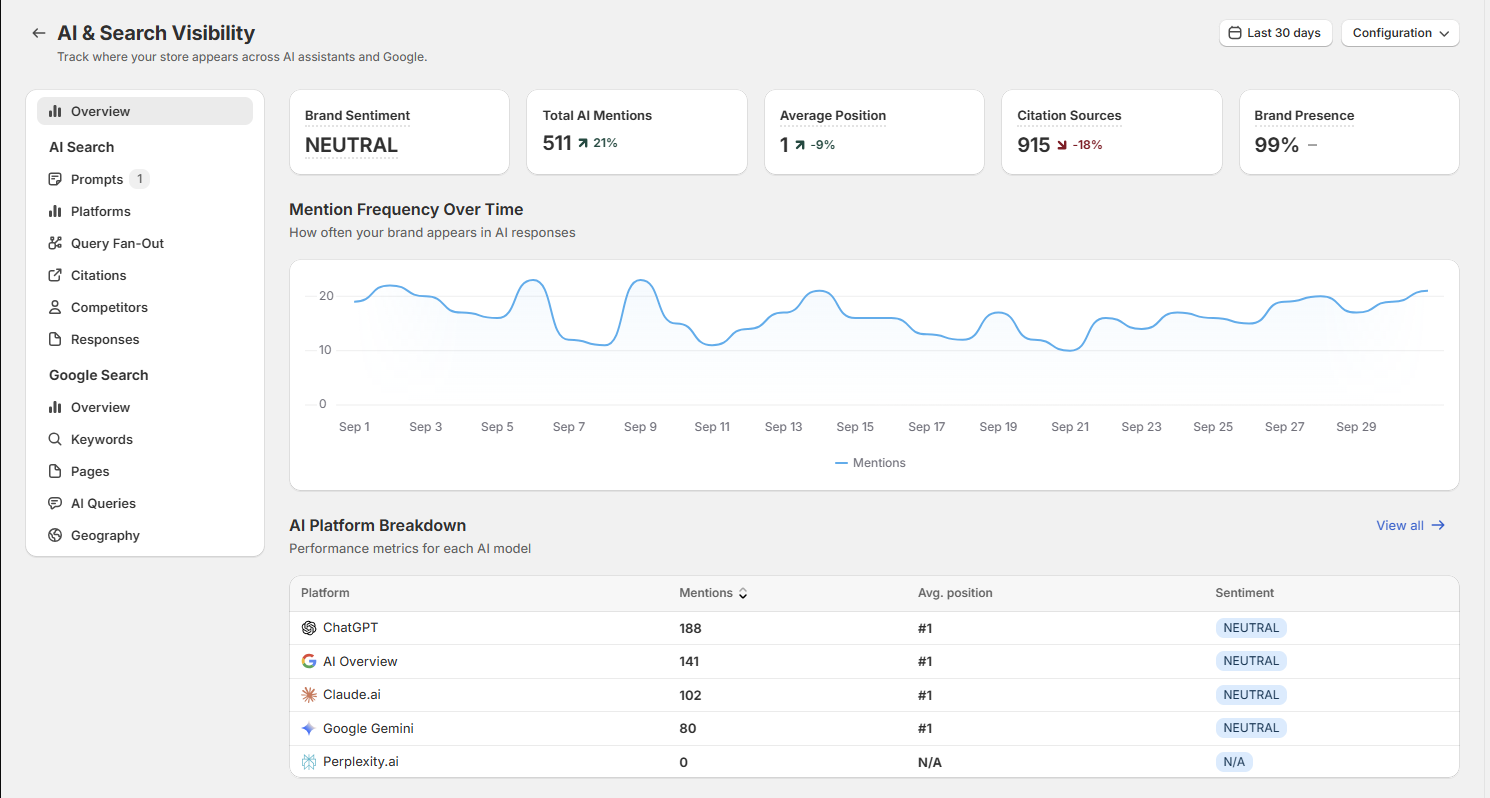
How to do it:
Go to AI & Search Visibility
Review your mentions, average position, competitors, sentiment, and the citation sources for each query.
Optional: add or edit queries so you track the questions your customers actually ask.
Connect Google Search Console to see your Google Search and AI Overview performance in the same place.
Step 3 (optional): Set your brand voice
Why this matters: Content Settings control the voice, publishing schedule, and optimization rules for both your articles and your product content, so everything sounds like you instead of generic AI. The defaults work fine. If voice matters to you, do this before Steps 4 and 5.
How to do it:
Go to Settings → Content Settings
Set your brand voice and tone.
Choose your publishing schedule.
Pick what you want optimized.
Step 4: Turn on AI Article Autopilot
Why this matters: Autopilot writes articles that answer real buyer questions, optimized for both AI and Google. Those articles get cited by ChatGPT and Perplexity and rank in Google, bringing in steady long-tail traffic without you planning content.
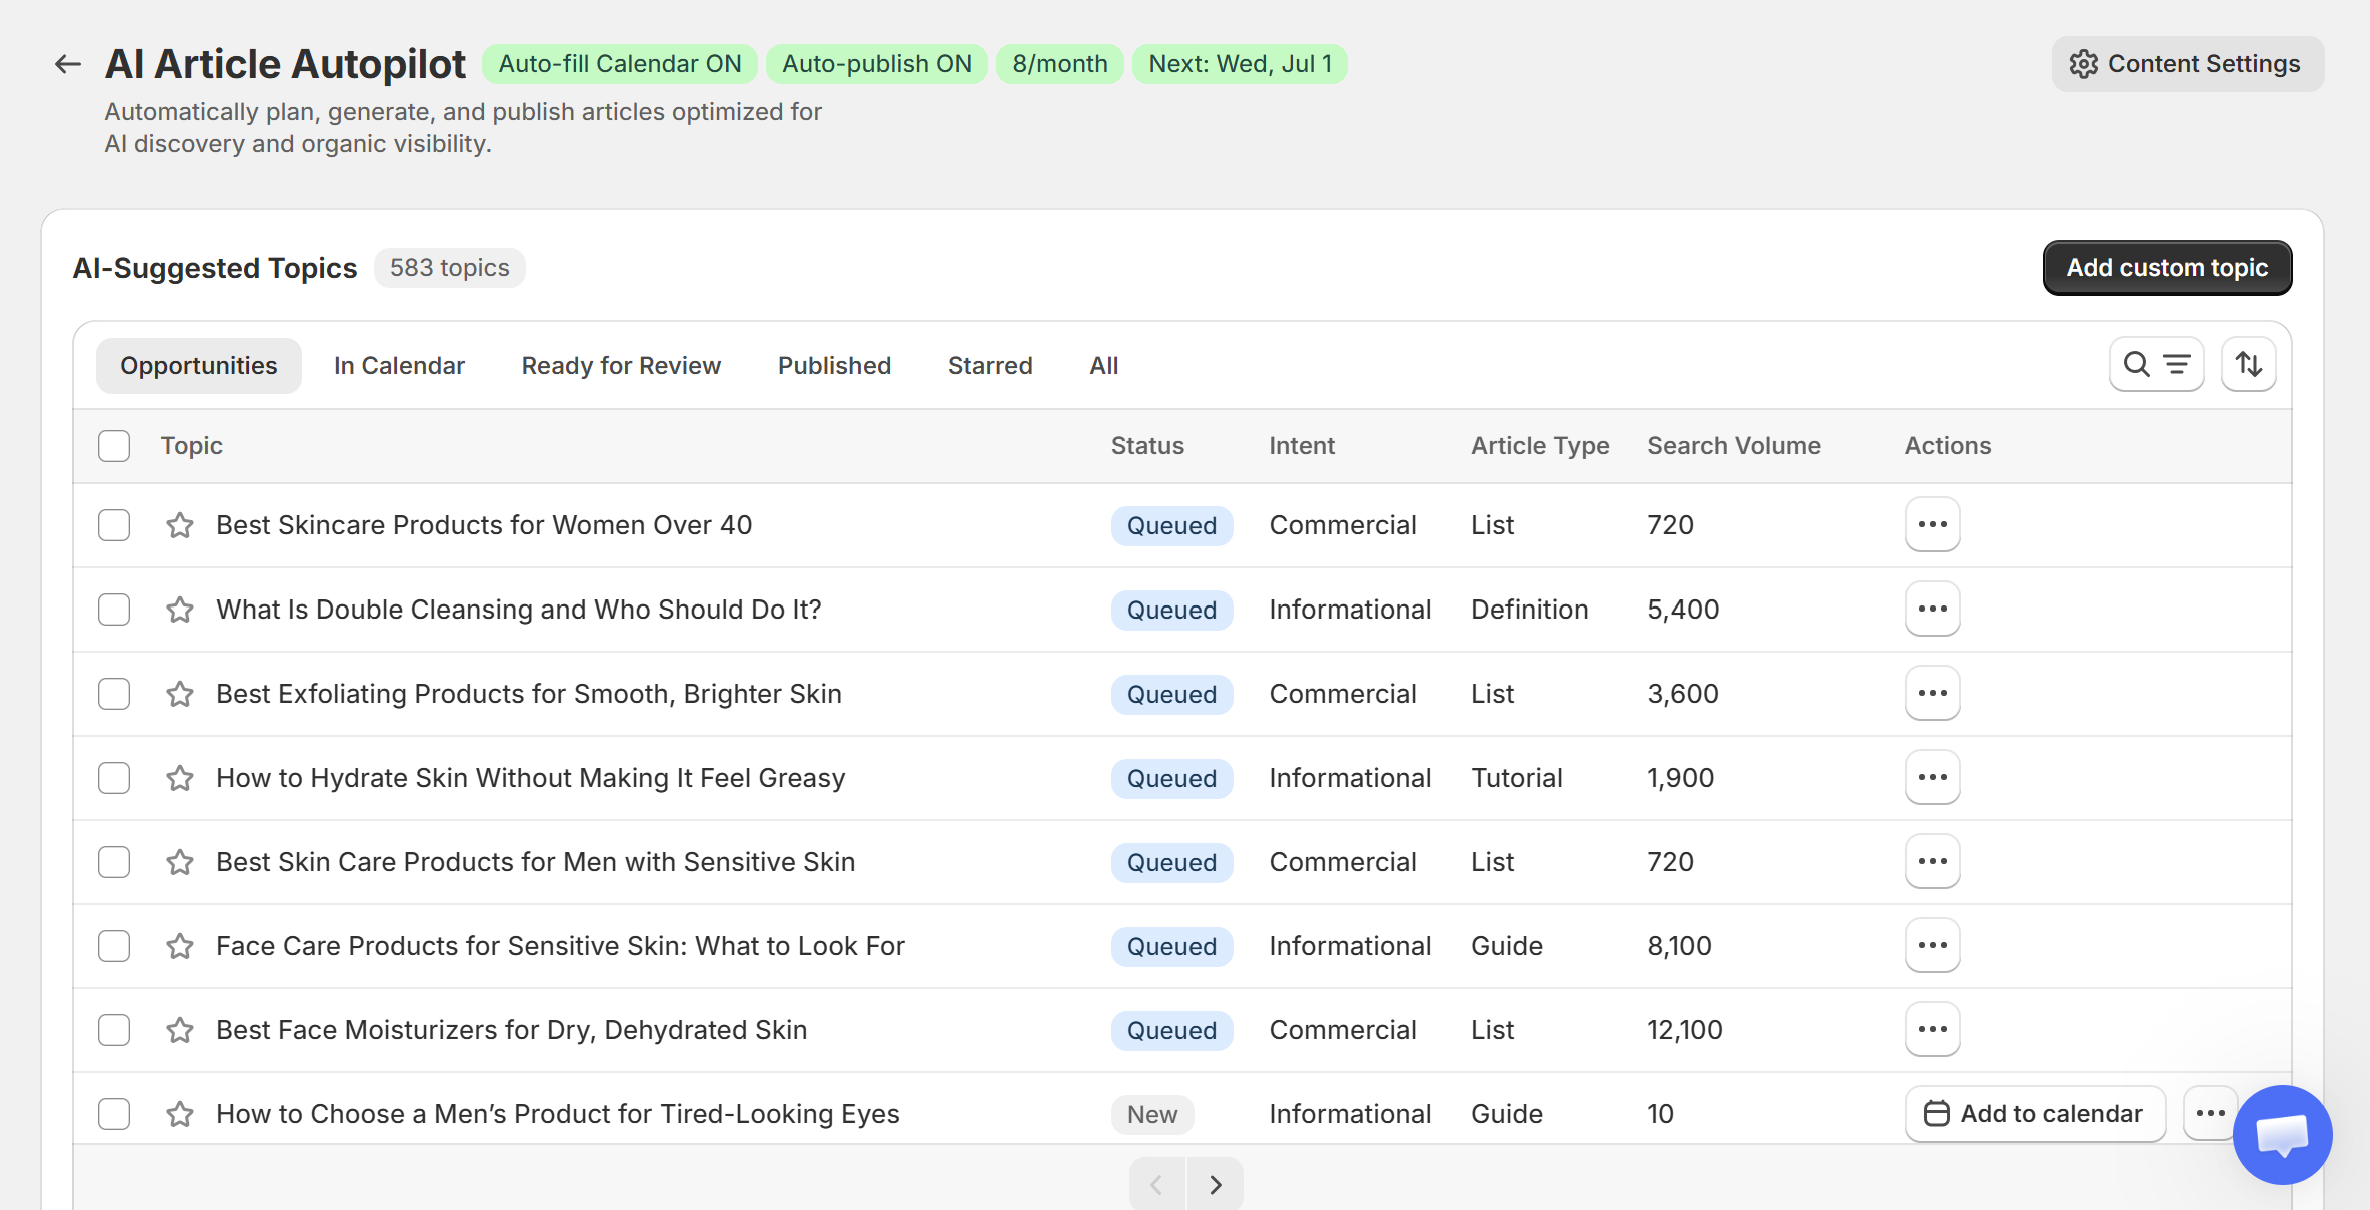
How to do it:
Go to AI Article Autopilot
Review the AI-Suggested Topics. These are generated from your site and business description, so filter, edit, or delete anything off-brand before you let it run.
Choose how articles publish: as drafts or auto-published (recommended) on a schedule.
Add topics to your content calendar, or set it to auto-fill.
Step 5: Optimize your first product
Why this matters: Optimized product pages, with clear titles, descriptions, FAQs, and alt text, are far more likely to be understood and recommended by AI. This is where raw product data becomes something AI can confidently cite.
How to do it:
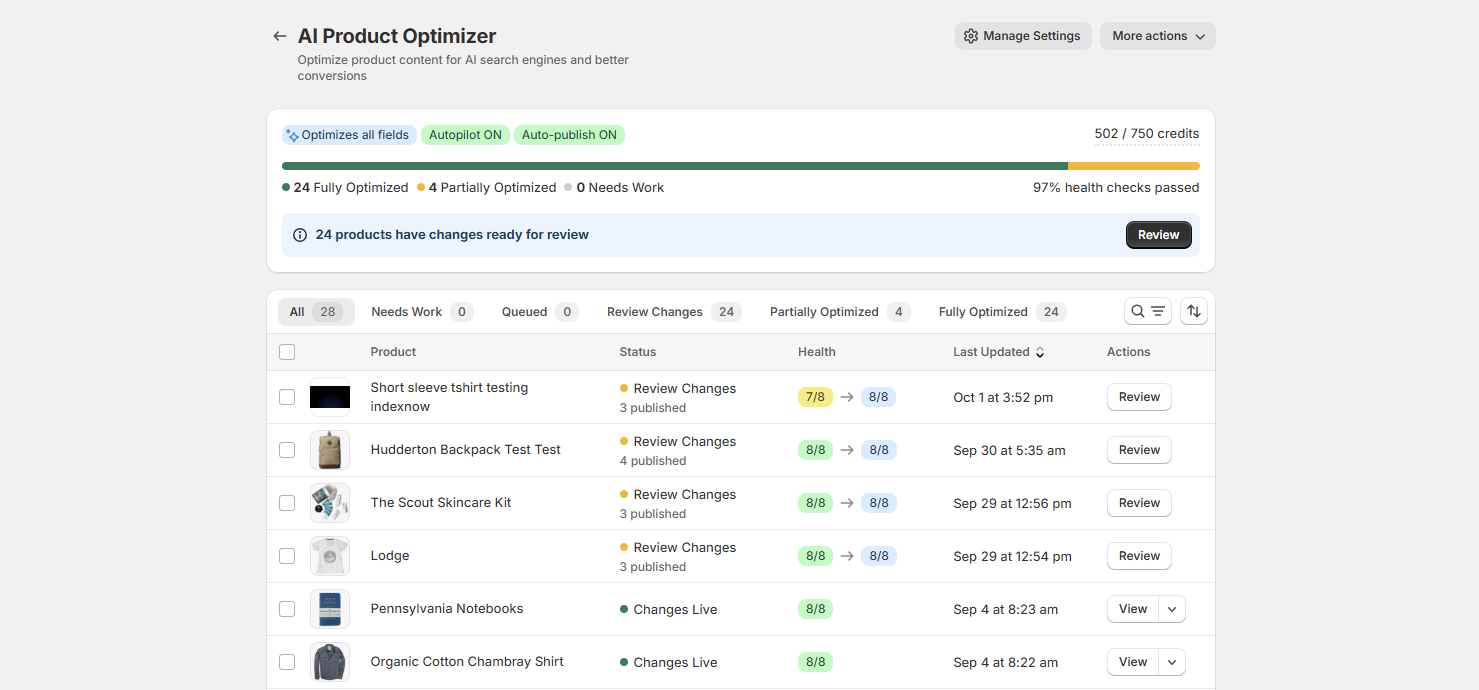
Go to AI Product Optimizer
Click Optimize on any product. Start with your top 10 best-sellers for the biggest impact.
Wait a minute or two while AI generates optimized content.
Review the suggestions: product title, description, meta title, meta description, FAQs, and image alt text. Each has an Apply changes toggle and a Regenerate option.
Edit anything you want, then click Publish all changes.
Nothing changes on your live store until you publish. You approve everything first.
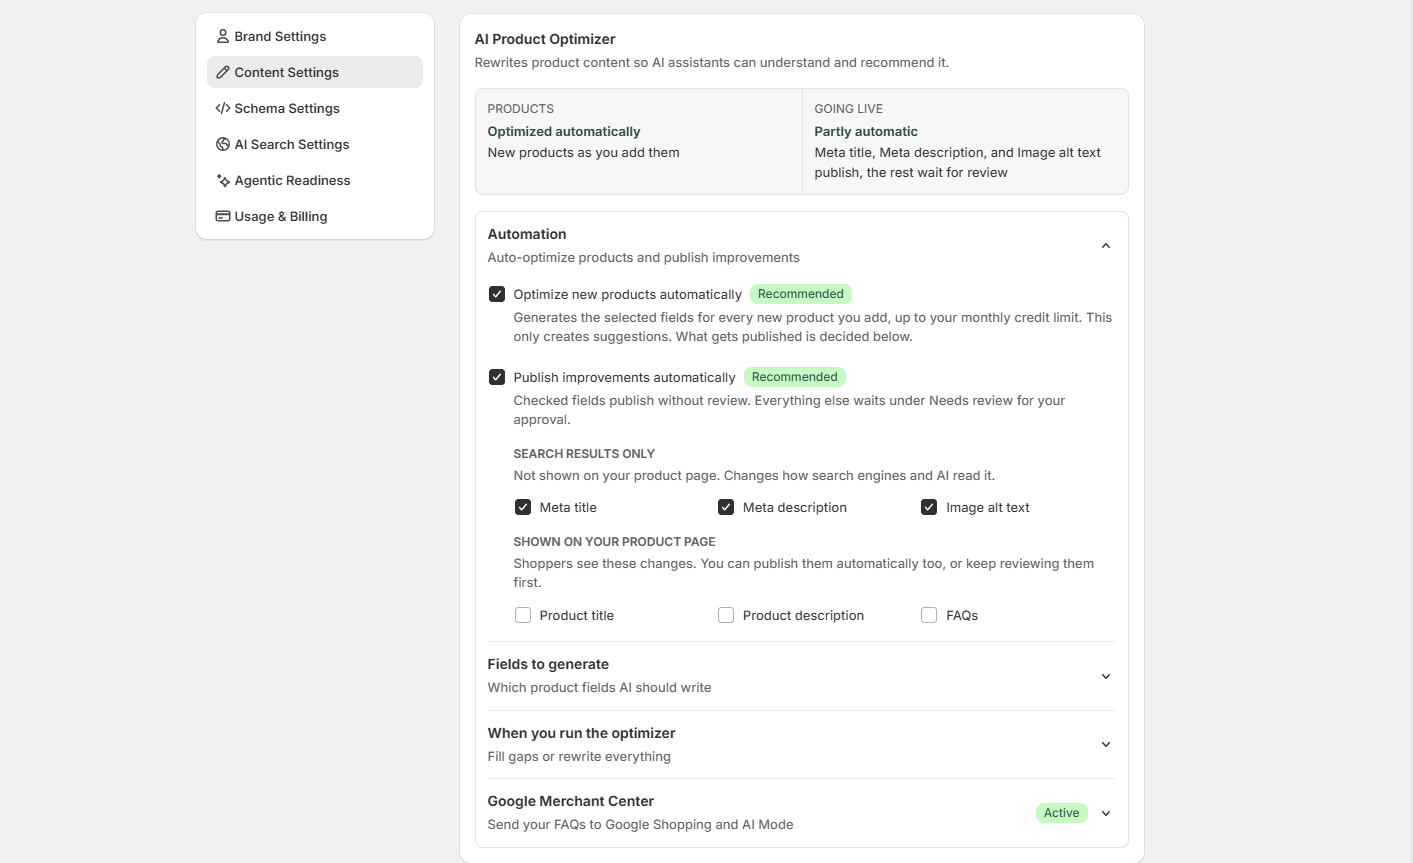
Pro tip: Happy with the results? Turn on Autopilot and Auto-publish in the AI Product Optimizer settings to optimize every new product you add automatically.
Show FAQs on your product pages (one-time setup)
Generating FAQs lets AI cite your answers. To also show them to shoppers on the page:
Go to Online Store → Themes → Customize
Navigate to Products → Default product
Click Add section in the left sidebar
Select Apps → StoreRank Product FAQs
Drag the section into place (we recommend just below the product description)
Click Save
This means fewer support tickets for you, and a clearer, more authoritative page for AI.
Step 6: Check your agentic readiness
The final check: is your store ready for AI shopping agents?
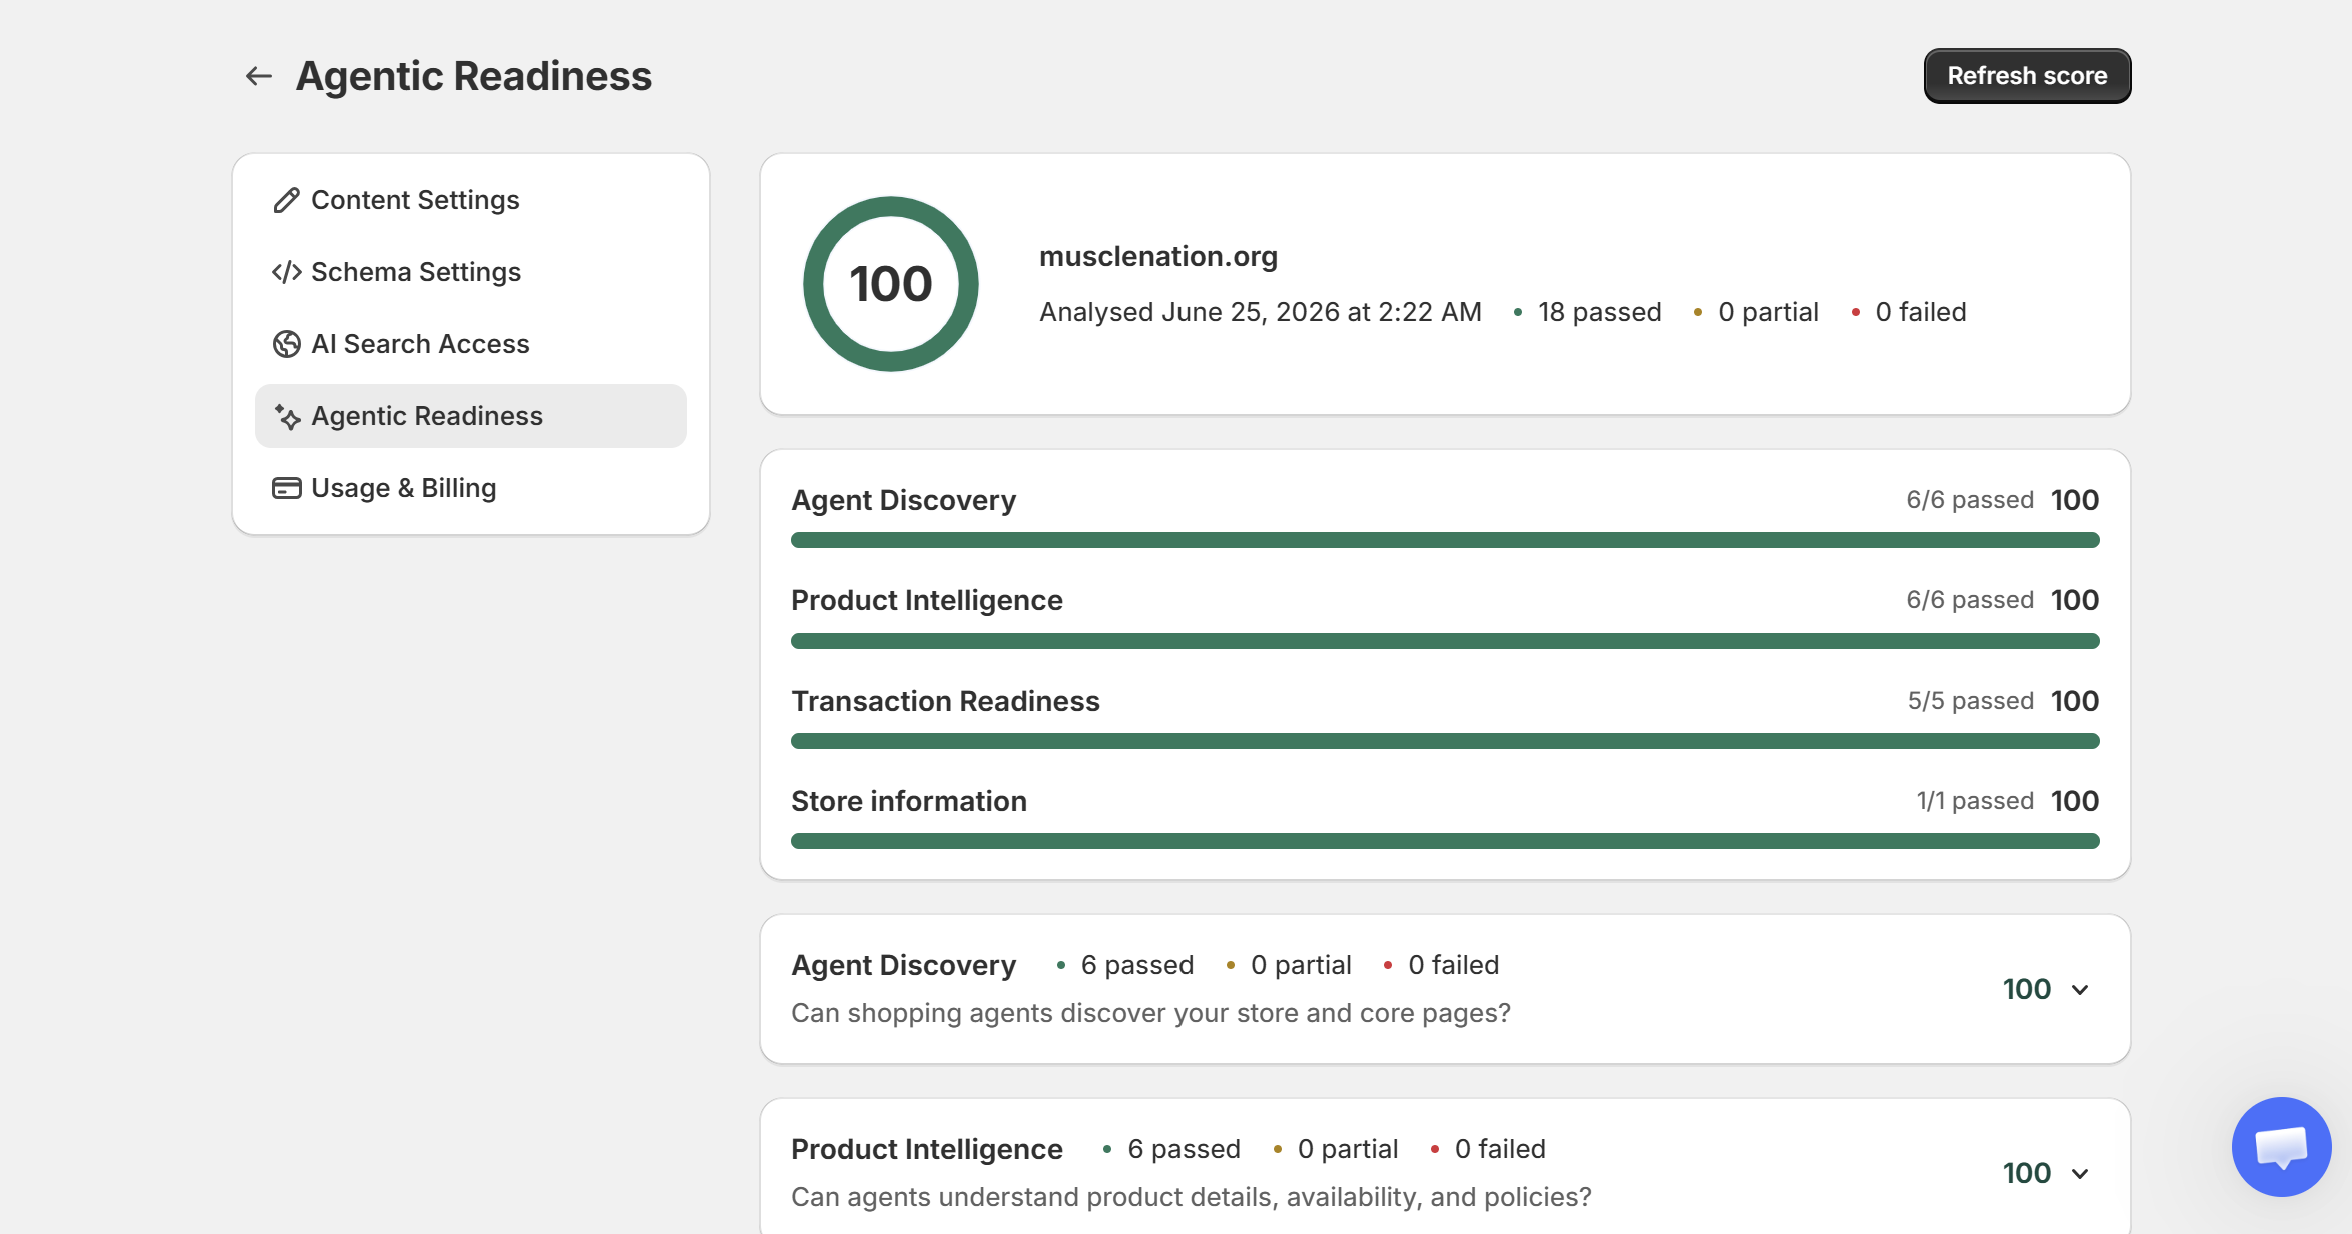
Why this matters: AI shopping agents (ChatGPT, Claude, and others) are starting to browse and buy on behalf of customers. This score shows whether they can find your store, understand your products, and complete a purchase.
How to do it:
Go to Settings → Agentic Readiness
Click Refresh score to run the analysis.
Review the four categories: Agent Discovery, Product Intelligence, Transaction Readiness, and Store Information.
Work through anything that isn't passing. Aim for green across the board.
What happens next
Week 1-2: AI platforms begin crawling your store.
Week 2-4: Visibility improves. First mentions may appear.
Month 2-3: More optimized content means more AI exposure.
Month 3+: Compounding growth.
Check back weekly: review AI & Search Visibility, keep Article Autopilot running, and optimize a few more products each visit.
🎉 That's it. Your store is now set up to be found, understood, and recommended by AI.
Was this helpful?
Still need help? Ask the team